DIY: Upcycle Your Old Basketball into a Vibrant Hanging Planter
From Court to Garden: How to Turn a Basketball into a Creative Hanging Planter

Looking to add a splash of colour and greenery to your living space without breaking the bank? This DIY project transforms an old basketball into a vibrant hanging planter, perfect for indoor or outdoor decor. Whether you have unused basketballs lying around or you’re seeking a creative weekend project, this colourful planter is a fun and budget-friendly option. It doesn’t require a lot of time or specialized tools, making it accessible for DIY enthusiasts of all skill levels.
Materials You'll Need:
To get started, here are the materials you’ll need for this colourful DIY project:
One basketball
Plastic grow pot or suitable container
Scissors
Acrylic paint in various bright colours
Paintbrushes
Solid rope or cord
Metal eyelets
Hole punch tool
Ceiling hook
LET'S DIVE INTO THE TUTORIAL
Follow these simple steps to turn your basketball into a standout piece of functional art that will brighten up any corner of your home!
Step 1: Prepare the Basketball
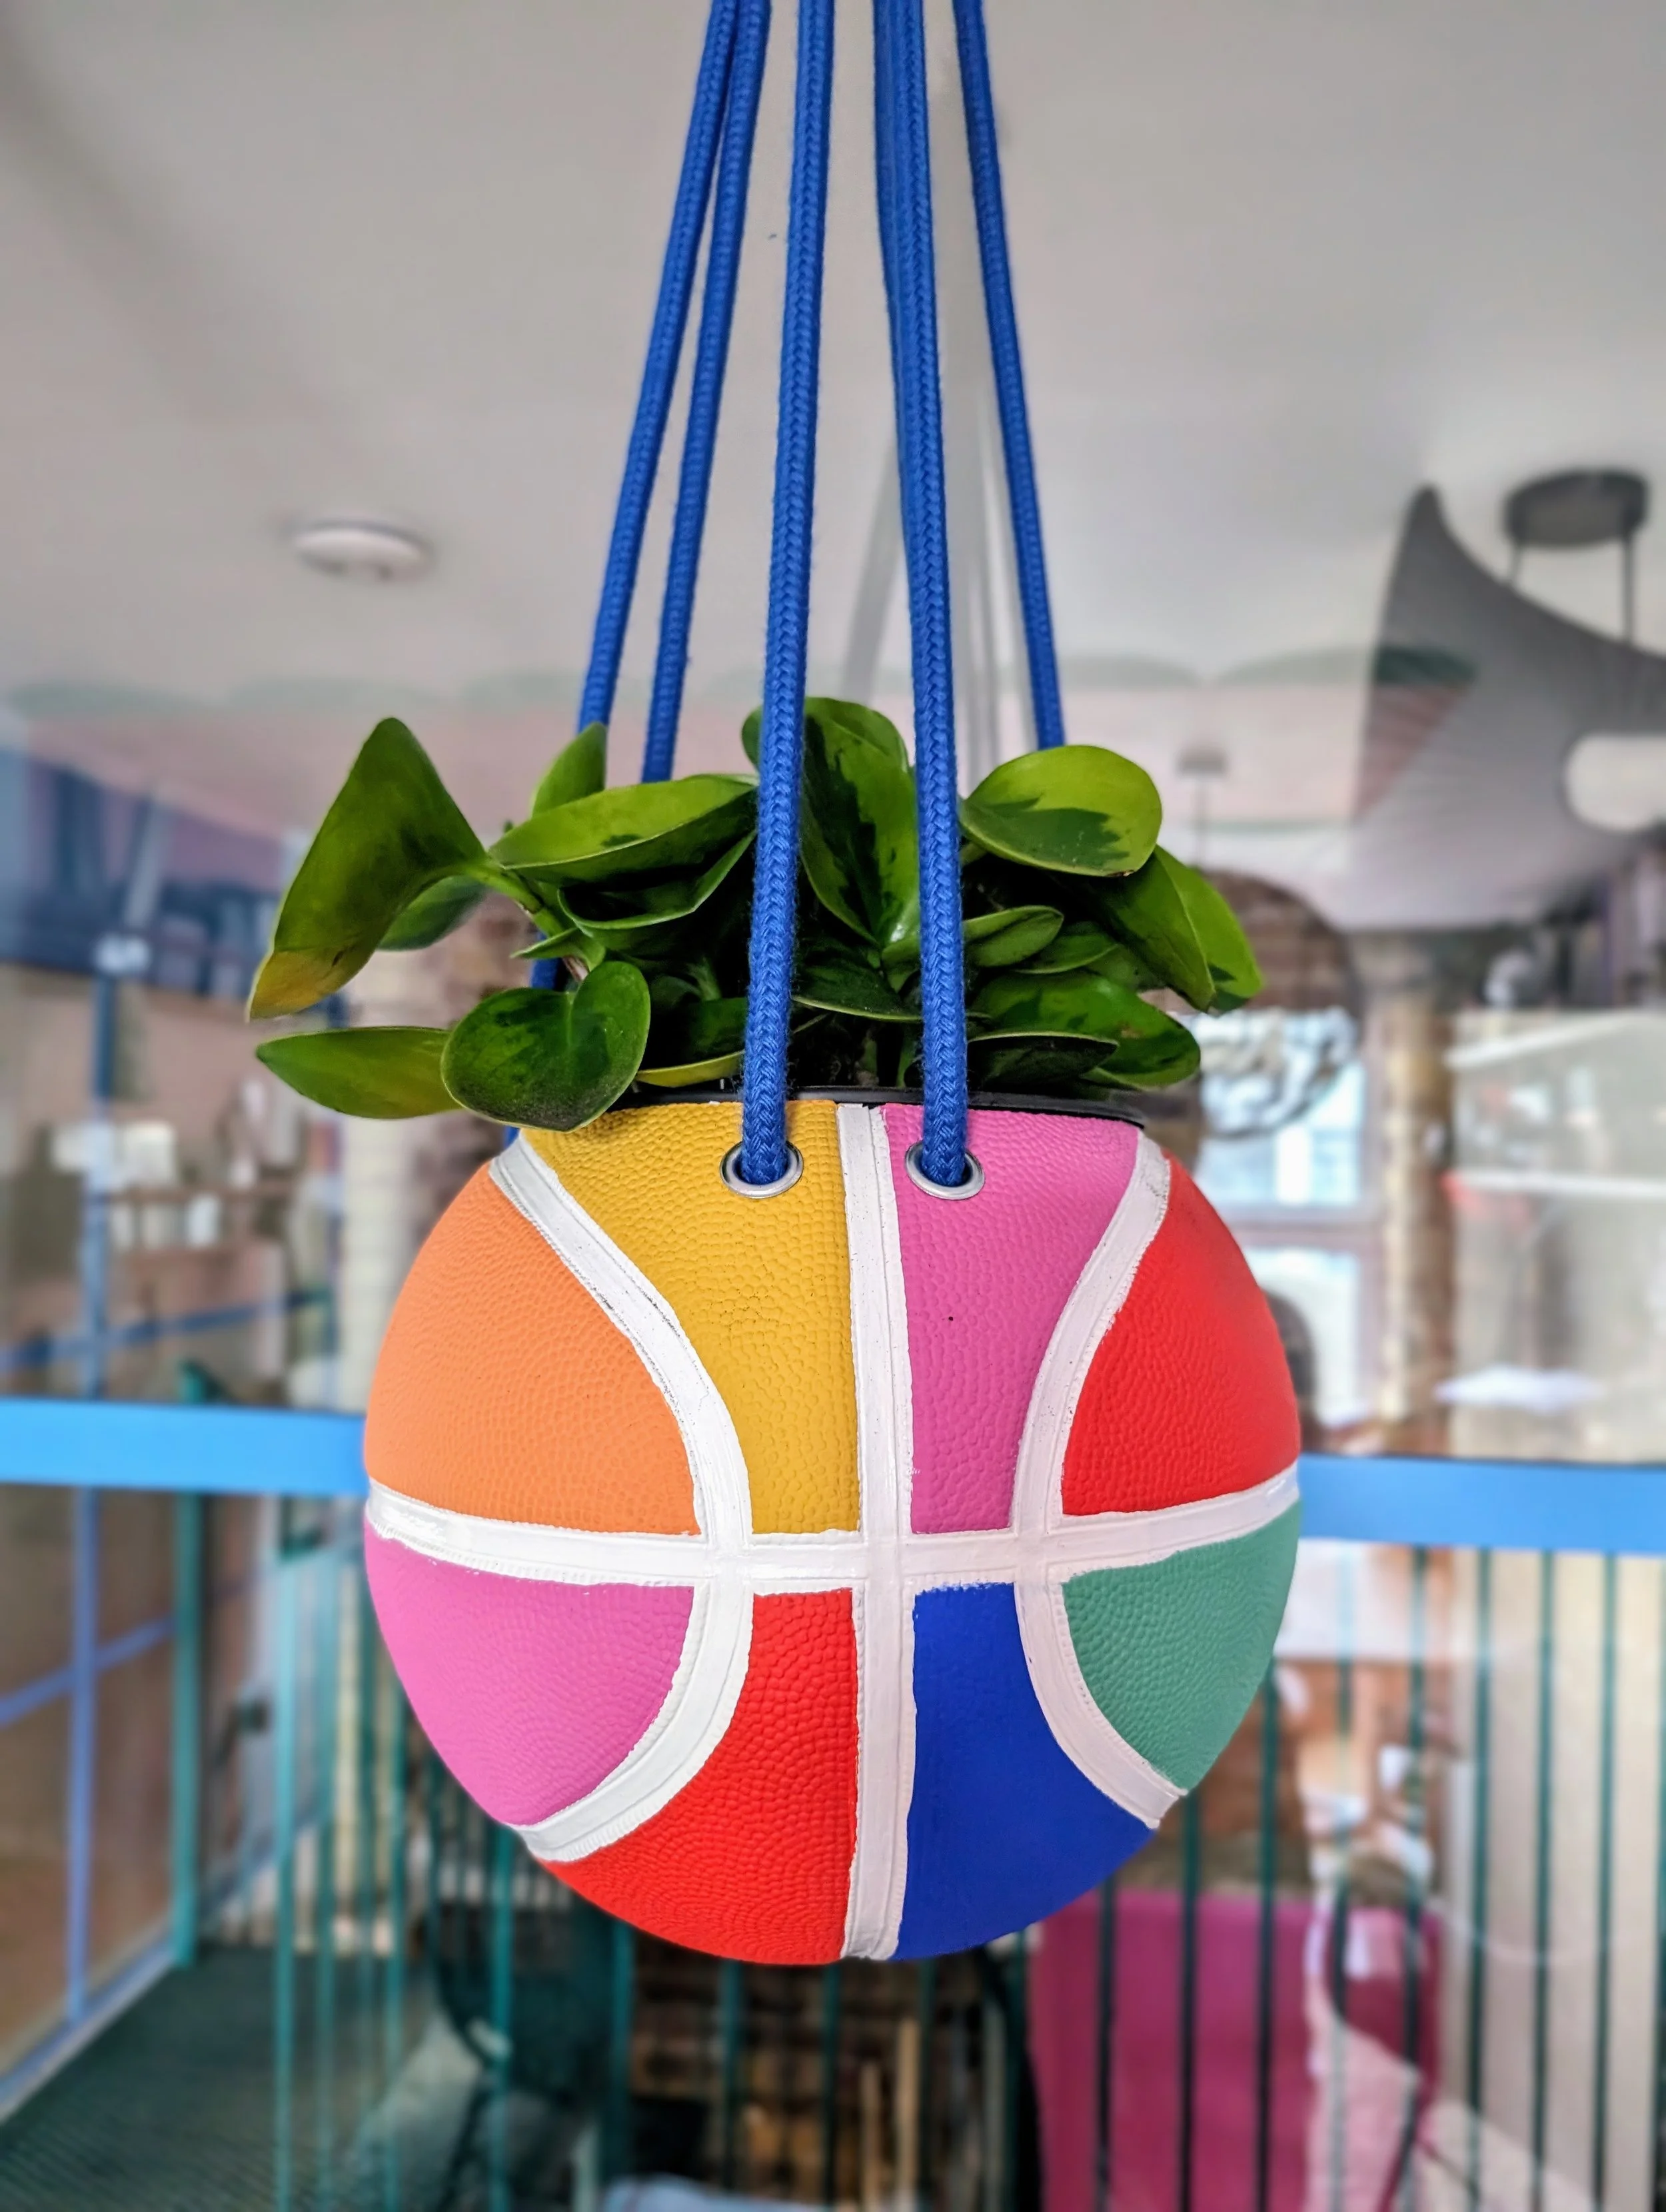
Fully Inflate the Basketball: Before beginning the DIY project, ensure the basketball is fully inflated. This step is essential to maintain the ball’s shape and structural integrity throughout the transformation process. I assure you that the ball won’t break. I was also sceptical when I first did this step but so I inflated the ball and allowed it to sit for at least a day to ensure it retained its shape.
Mark the Pot Size: Select a suitable plastic grow pot or container that will fit inside the basketball. Place the grow pot on top of the inflated basketball and use a marker to trace around the rim of the pot onto the surface of the ball. This marking will indicate the size of the hole you need to create.

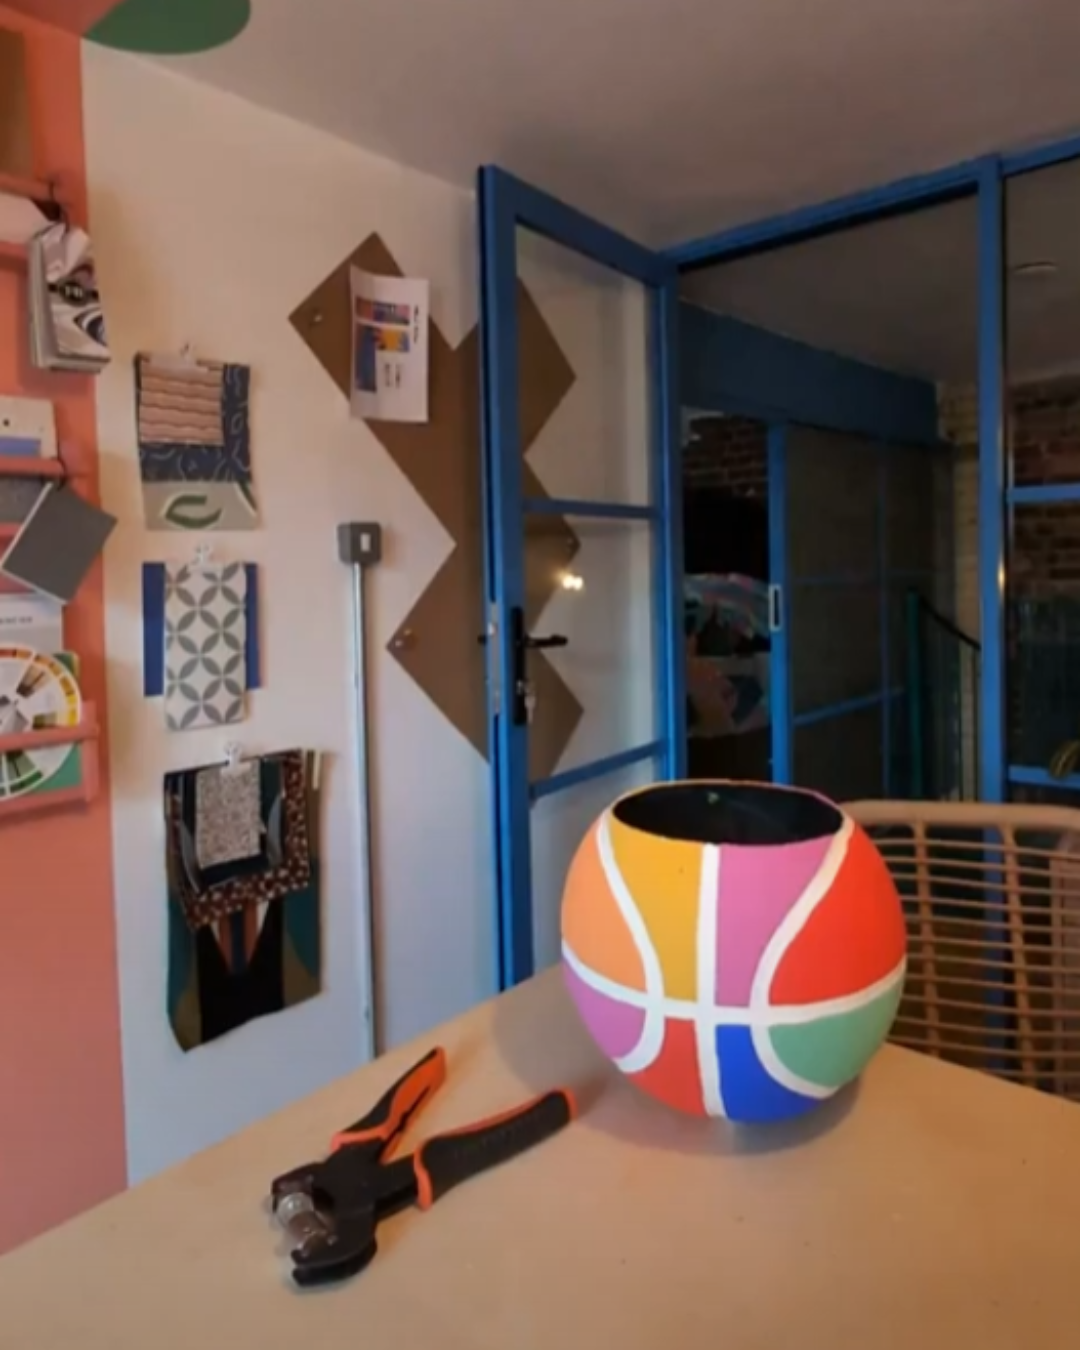
3. Cut the Hole:
With the basketball fully inflated, use a pair of sturdy scissors to carefully cut along the marked line on the ball to create a circular hole. Ensure the hole is large enough to comfortably accommodate the grow pot. Take your time to make clean and precise cuts, as this will be the opening for your planter.
Step 2: Paint Your Creation
Choose Your Favourite Colours: Select your favorite vibrant acrylic paint colours to decorate the basketball. Let your creativity shine by painting fun patterns or designs all over the surface of the basketball. Embrace the opportunity to use all your colours on this unique canvas!
Step 3: Set Up the Support System
Attach Metal Eyelets: Use a hole punch to create holes around the top of the basketball. Insert metal eyelets into these holes to provide sturdy attachment points for the hanging rope.
Thread the Rope: Cut a length of solid rope and thread it through the metal eyelets. Make sure to leave enough rope to create hanging loops and knots.
Secure with Knots: Tie secure knots at the ends of the rope inside the basketball to ensure the hanging planter is sturdy and safe.

Step 4: Hang Your Colourful Planter
Choose a Location: Find a suitable spot indoors or outdoors where you want to hang your colourful basketball planter. Consider areas that could use a splash of colour and greenery.
Install the Ceiling Hook: Use a ceiling hook to securely hang the planter from the desired location. Ensure the hook is firmly attached to support the weight of the planter.
Step 5: Enjoy Your Creation
Add Plants: Place a grow pot or container inside the basketball planter. Add your favorite indoor plant or small trailing vine that will thrive in this unique hanging display.
Tip: Listen / watch to Colour Your Home Happy episode 6 with Joelix to get some colourful plant inspiration!Admire the Result: Step back and admire your handiwork! The colourful basketball planter will bring a perfect combination of art, colour, and greenery into your living space.


Tutorial Video
For a visual guide to this DIY project, you can watch my tutorial video on YouTube:
DIY – Transform a basketball into a colourful planter
Follow along to see each step in action and get inspired to create your own uniquehanging planter!
Family-Friendly DIY Activity

This DIY project is not only a great way to upcycle an old basketball but also a fun activity to enjoy with family or friends. I made mine with my husband, and we had a fantastic time getting creative together.
I hope you’ll enjoy this project as much as we did!
Want to embrace more colourful and creative home décor ideas?
Check out my online course, Colour Your Home Happy! It's a fun, interactive experience designed to help you break free from design rules and create a colourful home that reflects your true personality ✨.
Show Off Your Creation!
I’d love to see your colourful basketball planters! Share your creations on social media and tag me @rainbow.shaker so we can spread some bouncy joy together!
Happy crafting 🏀🎨!